Posted in Candle Making, Projects

Natural Soy Wax Candle Making for Beginners

SUMMER!!! Summer to me means time away from work that I can concentrate on spending time with my kids, taking vacations and completing projects. Projects that involve learning new things that I have always wanted to learn or crafting projects with the kids or just deep cleaning the house.

This summer I decided to learn how to make candles. This was one of the things I have always wanted to learn and decided that this would be the summer.

Scented candles are burnt frequently at my house as we love the smell and look of a burning candle. However, they can become quite costly when shopping at Bath & Body Works, Yankee or other places. So my daughter and I headed to Hobby Lobby.

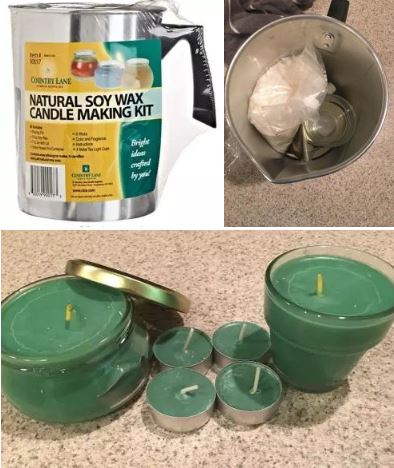
When we were first started looking through the aisle of candle making supplies, we were very overwhelmed with all of the options and didn’t know where to start or what even to buy to begin. Luckily we found a Natural Soy Wax Candle Making Kit from Country Lane which had all the things we needed to begin making our first candle. (You can also buy this from Amazon)

The kit included…

  • Pouring Pot (for melting the wax and pouring it directly into the glass)
  • 14 oz of Soy Wax
  • 7 oz jar with lid
  • Votive Flower Pot Container
  • 6 Wicks
  • Color and Fragrance (There was a ton of color in mine- I only used 1 out of 9 squares)
  • Instructions
  • 4 Metal Tea Light Cups

All of the supplies were packed nice and neat into the pouring pot. Once we laid everything out, we began reading the instructions. They were very easy to follow. Inside the kit came 9 green coloring block dyes and a 0.5 ounce bottle of pearberry scent. I used the entire bottle of scent but still have 8 of the dye blocks to use for other candles.

The 14 oz of wax that was included made 4 tea candles, the flower pot container and the 7 oz jar candle. I actually had wax left over that I used to top some of my other candles off. We were so surprised at how easy these were to make, especially since this was our first time and we had no idea what we were doing.

This was definitely a great project and I would definitely recommend this kit for anyone who is a beginner and wants to learn. I know after doing this, I can now order wax, wicks and color blocks off Amazon or walk into Hobby Lobby and actually know what I’m looking at in the aisle. We are looking forward to making other types of soy candles and different scents in the future. We have even started saving our glass jars (ex: pasta sauce, pickels, etc) to reuse so we don’t have to keep buying glass containers. No more buying the expensive candles for me!


Posted in Math is Awesome!, Task cards with QR Codes, Teachers Pay Teachers Store

Classifying Triangles (Sides & Angles) Task Cards

Classifying Triangles by Sides & Angles for 4th-6th grade

I created these task cards to be used with my 5th graders for our Geometry unit. However any grade can use them for enrichment or review.  I use task cards quite frequently and my kids love them.

Usually, my students will use these cards to practice at their table groups while I work with small groups in the back of my classroom. However, you can also set these up as a Math Workshop station or as a Scavenger Hunt around the room or hallways.

The QR code ensures that my students are not practicing incorrectly. Each task card comes with a code that students can scan on iPads, phones or computers. The QR code immediately pulls up the answer. Students can check their work and figure out if they made a mistake or not. There is also an answer key included that students can use without using the QR codes.

This version contains 28 task cards designed for 4th -6th grade but can be used as a review or enrichment in different grades.

  • Task Cards #1-8 Students classify triangles by their sides – includes a list of choices
  • For Task Cards # 9-16 Students classify triangles by their angles – includes choices
  • Finally, for Task Cards #17-28 Students classify triangles by both sides and angles (no choices)

The choices allow students to practice classifying them correctly with assistance before giving them the card that do not have each of the types of angles/sides listed.

The best part about the QR codes, is that if the students make a mistake, they can figure out where they went wrong and correct their mistakes. This provides instant feedback, even when the teacher is not right beside them.

The only prep and materials that are required are a printer, scissors and some lamination (optional). I also have a set of these in black and white that I have cut out and glued to colored paper since our printer at school is only black and white. I usually laminate everything so that I can reuse them year after year.

If you are ready to use them, please check out my store at teachers pay teachers or I also have them available through TES found here.

If you like these cards or would like to see more fun math lessons, please check out….

math, homeschool, triangles, middle school

Processing…
Success! You're on the list.
Posted in Girl Scouts

Girl Scout Cookie Safety Bingo

Each cookie selling season we go over safety rules for selling Girl Scout Cookies. The following Bingo Safety game is great for younger girls who are beginners in selling cookies and as a great review for our older girls who are now pros. This is one of the best ways we have found to teach cookie selling safety and is a free resource on Little Brownie Bakers.

Safety Bingo is an awesome way to go over safety rules in a fun way. The directions are found on the Little Brownie website and look like this.

For our girls, we printed out each of the cookie bingo cards – found here in color and on cardstock so they will be more durable (they look like the one at the top of this page). – There are 20 different cards. Every scout gets her own card as we discuss each of the safety rules.

To call out the safety rules, there are colored signs that the leaders can use. They are found here. We just printed out one copy and went over them as the girls covered their picture icons. You can use about anything as Bingo markers. I used the flat glass beads that you can get at Dollar Tree that are flat on one end.  Amazon has them as well. We have also used colored buttons in the past.

The best part about this game, is that each icon is located on every card, just in a different place. This is great for the Daisies and Brownies. By playing multiple games, we are enforcing each of the rules. The girls love it!

Click below to check out some of our other cookie games that we have used…

Or.. If you would like to check out a few Girl Scout Cookie Recipes, click on Menu at the top or just click one of the links below..

Posted in Girl Scout Cookie Recipes, Scout Recipes

Girl Scout Tagalong (Peanut Butter Patties) Recipes

These are a couple of recipes using Tagalongs (or Peanut Butter Patties) Cookies from the Girl Scout website that I thought looked amazing! Nutty Caramel Turtles and Peanut Butter Trail Mix Fudge! I will be definitely be trying these out when our cookies arrive!

If you haven’t seen any Girl Scouts knocking on your door or seen any at the local grocery store, I am posting my daughter’s store below. (Her troop is saving for a trip next summer to Costa Rica where they will be participating in a Global Community Project.)

These amazing cookies are available online and she will be selling until March 25 ,2019! These cookies will come directly from the bakery to your house! https://digitalcookie.girlscouts.org/scout/madison1827

No matter where you buy your Girl Scout Cookies- Thank you so much for supporting Girl Scouts! AND.. if you get to try any of these recipes before I do, let me know how it turns out!

Nutty Caramel Turtles

Created by: Michele Kusma

Nutty Caramel Turtles is the Candies category winner of the 2015 National Girl Scout Cookie recipe Contest Sponsored by Taste of Home®. Congrats on a job deliciously well done!

Prep: 10 min. Bake: 5 min. + standing

  • 3 milk chocolate candy bars (1.55 ounces each)
  • 12 caramels
  • 60 pecan halves
  • 12 Girl Scout Peanut Butter Patties®/Tagalongs® cookies

Preheat oven to 250°. Break each chocolate bar into fourths. Place each piece 2 in. apart on a parchment paper-lined baking sheet. Top with one caramel.

Bake 5-7 minutes or until caramel just starts to soften. Immediately press one pecan half on one side for head; press four pecan halves onto each corner for legs. Place one Peanut Butter Patties®/Tagalongs® cookie over the top of each candy, pressing down to secure. Let stand until set. Yield: 1 dozen.

Peanut Butter Trail Mix Fudge

Created by: Kim Varner

Prep: 10 min. + chilling

  • 1 pound white candy coating, chopped
  • 1 cup creamy peanut butter
  • 1 package (6-1/2 ounces) Girl Scout Peanut Butter Patties®/Tagalongs® cookies, coarsely chopped, divided
  • 1 cup coarsely chopped salted peanuts, divided
  • 1/2 cup chopped dried cherries, divided

Line a 9-in.-square pan with foil, letting ends extend up sides. In a large microwave-safe bowl, melt candy coating with peanut butter; stir until smooth.

Stir in 1 cup chopped Peanut Butter Patties®/Tagalongs® cookies, 1/2 cup peanuts and 1/4 cup cherries. Spread into prepared pan. Sprinkle with remaining chopped Peanut Butter Patties®/Tagalongs® cookies, peanuts and cherries. Refrigerate until firm.

Using foil, lift fudge out of pan. Remove foil; cut fudge into 1-in. squares. Store between layers of waxed paper in an airtight container. Yield: 2 pounds.


If you would like to check out a few other Girl Scout Cookie Recipes, click on Menu at the top or just click one of the links below..

Posted in Girl Scout Cookie Recipes, Scout Recipes

Girl Scout Cookies -Thin Mint Recipes

These are a few recipes using Thin Mint Cookies from the Girl Scout website that I thought looked amazing! Peppermint Cheesecake, Thin Mint Popcorn and Thin Mint Cupcakes! I will be definitely be trying these out when our mints arrive!

If you haven’t seen any cute Girl Scouts knocking on your door or seen any at the local grocery store, I am posting my daughter’s store below. (Her troop is saving for a trip next summer to Costa Rica where they will be participating in a Global Community Project.)

These amazing cookies are available online and she will be selling until March 25 ,2019! The cookies will come directly from the bakery to your house!

https://digitalcookie.girlscouts.org/scout/madison1827

No matter where you buy your Girl Scout Cookies- Thank you so much for supporting Girl Scouts! AND.. if you get to try any of these recipes before I do, let me know how it turns out!

Peppermint Chip Cheesecake

Prep: 20 min.; Bake: 1 hour + chilling

  • 1 package (10 ounces) Thin Mints® Girl Scout Cookies, crushed
  • 3 tablespoons butter, melted

FILLING:

  • 3 packages (8 ounces each) cream cheese, softened
  • 3/4 cup sugar
  • 5 teaspoons cornstarch
  • 3–4 drops green food coloring, optional
  • 3 eggs, lightly beaten
  • 1 egg yolk, lightly beaten
  • 1/2 cup heavy whipping cream
  • 2 teaspoons peppermint extract
  • 1 1/4 teaspoons vanilla extract
  • 1 cup miniature semisweet chocolate chips

In a small bowl, combine cookie crumbs and butter. Press onto the bottom and 1 in. up the sides of a greased 9-in. springform pan.

In a large bowl, beat the cream cheese, sugar, and cornstarch until smooth. Add eggs and egg yolk; beat on low speed just until combined. Stir in the cream, extracts, and food coloring if desired. Fold in chocolate chips. Pour into crust. Place pan on a baking sheet.

Bake at 325° for 50–60 minutes or until center is almost set. Cool on a wire rack for 10 minutes. Carefully run a knife around edge of pan to loosen; cool 1 hour longer. Refrigerate overnight. Refrigerate leftovers. Yield: 12 servings.


Thin Mints® Popcorn

Created by: Amber Szydlo

Prep/Total Time: 25 min.

  • 10 cups plain popped popcorn
  • 25 Girl Scout Thin Mints® cookies, coarsely chopped, divided
  • 1-1/2 cups white baking chips
  • 1 teaspoon shortening
  • 1 cup Andes creme de menthe baking chips

In a large bowl, combine popcorn and half of the crushed Thin Mints® cookies. In a microwave, melt baking chips with shortening; stir until smooth. Pour over popcorn mixture; toss to coat.

Immediately spread onto waxed paper; sprinkle with remaining crushed Thin Mints® cookies. Melt baking chips in microwave; stir until smooth. Drizzle over popcorn; let stand until set.

Break into pieces. Store in an airtight container. Yield: 3-1/2 quarts.


Thin Mints® Cupcakes

Created by: Crystal Oliver

Prep: 40 min. Bake: 15 min. + cooling

  • 2 packages (9 ounces each) Girl Scout Thin Mints® cookies, divided
  • 1 package (8 ounces) cream cheese, softened
  • 1 package chocolate cake mix (regular size)

GANACHE:

  • 4 ounces semisweet chocolate, chopped
  • 1/2 cup heavy whipping cream
  • 1/4 teaspoon peppermint extract

FROSTING:

  • 1 cup butter, softened
  • 1 cup shortening
  • 1 teaspoon vanilla or almond extract
  • 1/2 teaspoon salt
  • 3/4 cup baking cocoa
  • 1/2 cup 2% milk
  • 4 to 4-1/2 cups confectioners’ sugar

Preheat oven to 350°. Reserve six Thin Mints® cookies for garnish. For truffles, place remaining Thin Mints® cookies in a food processor; process until finely crushed. Add cream cheese; process until blended. Roll into twenty-four 1-1/2-in. balls.

Line 24 muffin cups with paper liners. Prepare cake mix batter according to package directions. Drop 1 tablespoon batter into prepared muffin cups. Place one truffle in center of cup. Fill two-thirds full with remaining batter.

Bake 14-18 minutes or until a toothpick inserted in the cake portion comes out clean. Cool in pans 10 minutes before removing to wire racks to cool completely.

Place chocolate in a small bowl. In a small saucepan, bring cream just to a boil. Pour over chocolate; let stand 5 minutes or until chocolate is melted. Stir with a whisk until smooth. Stir in peppermint extract. Cool ganache 15 minutes, stirring occasionally.

For frosting, in a large bowl, beat butter, shortening, vanilla and salt until creamy. Beat in baking cocoa and milk alternately with enough confectioners’ sugar to reach spreading consistency. Frost cupcakes; drizzle with ganache. Garnish with reserved Thin Mints® cookies. Yield: 2 dozen.

If you would like to check out a few other Girl Scout Cookie Recipes, click on Menu at the top or just click one of the links below..

Posted in Christmas, Perler Bead Patterns

Easy DIY Christmas Perler Bead Ornaments

Want some easy family Perler bead patterns that can easily transform into Christmas ornaments?  Look no further, this family fun craft was easy to make and looks great on the tree.

We used the pixelated images to create the designs on boards, melted the beads and attached a Christmas ornament hook at the top. However, in my newest ones, I have used a ribbon which I attach before I iron. In my Etsy Store and my store, www.galaxyofpixels.com – I have these kits ready to go. You can purchase them for $2 or $2.50 a piece and they have exactly what you need to make these ornaments.

Our results are below.

Christmas Bell with Holly

Bells with holly Christmas ornament made with Perler beads

Christmas Wreath Ornament

Christmas Gingerbread Ornament

Christmas Candy Cane Ornament

Christmas Holly Ornament

Snowman Ornament

Our family loves making lots of Perler crafts.  If you would like to see some other designs, click menu at the top or the links below…

Also, Check our our Etsy Store -GalaxyofPixels!

Christmas Ornament Perler Bead Patterns DIY

Please join our email list to follow our site. We promise not to sell or spam your email!

Processing…
Success! You're on the list.
Posted in Math is Awesome!

10 Real World Math Mistakes – Perfect for students to find the mistake!

math pin

Real World Math Sales that don’t exactly scream sale… I tell my students daily to check their answers- does their answer make sense, especially in the context of their problem? The following pictures are some examples of people who have not checked their answers in the real world. My students love seeing these, finding the errors and laughing at the mistakes adults made. There are a couple that have no mistakes but still don’t add up to a “sale.”

The following are a few that I have used in my classroom and are some of my students’ favorites. Click on the pictures to go to the original sites.

Real World Math Errors and Fun for Students


If you like these, please check out my other post… Part 2 – 10 Real World Math Fails- Can you Spot the Mistake?

Please join our mailing list below to get updates and follow our blog.  Thank you for joining!

Processing…
Success! You're on the list.
Posted in Christmas, Perler Bead Patterns, Super Mario Patterns

Super Mario Perler Bead Christmas Ornaments

Capture

Our family is a huge Nintendo fan and our kids have grown up playing all the Super Mario franchise games. This year, the kids had their own tree to decorate and we decided to make some Perler beads ornaments. We are looking forward to making lots of ornaments this holiday season.

In the pictures below, I used a Christmas hook, However, in my newest ornaments, I have used a ribbon which I attach before I iron. In my Etsy Store and my Online Store, www.galaxyofpixels.com – I have several of these kits ready to go with more on the way. You can purchase them for $2 or $2.50 a piece and they have exactly what you need to make these ornaments.

Mario and Luigi in Christmas Stockings

Mario in the stocking! After making Mario, I changed the red to green to create Luigi. When ironing, we left one of the top beads open and not too melted. This allowed us to put a Christmas hook into the hole which helped it fit easily on the tree.

Super Mario and Luigi Christmas Ornaments Perler/ Hama Beads

Red and Green Mushrooms

Same as above- once made, we melted everything but the top bead to allow for the ornament hook.

Super Mario Mushrooms Christmas Ornaments Perler/ Hama Beads

Star and Mushroom Tree

Don’t forget while melting to leave room for the hook.

Super Mario Mushrooms Christmas Ornaments Perler/ Hama Beads

Processing…
Success! You're on the list.

Yoshi Christmas Wrapped Egg!  

This Christmas wrapped Yoshi Egg was super easy to make and looks great as a Christmas ornament.

Super Mario Perler Yoshi Egg Christmas Ornament

Mario Santa

This Mario Santa turned out super cute!  Made with sand, black, white and red Perler beads.  Will also work for Hama or just plain melty beads.

Super Mario Perler Santa Christmas Ornament Hama Melty

If you would like to see some other Super Mario patterns, visit menu at the top of click the links below.

Also, Check our our Etsy Store -Galaxy of Pixels! Sign up for our shop newsletter to receive a 10% off coupon for your next order.

Posted in Book Reviews, Young Adult Books

Countryside #2- Tears of Adina Book Review

Counntryside - The Tears of Adina- Book 2Countryside: The Tears of Adina by J.T. Cope IV

From Goodreads:

“Luke Rayburn has spent summer vacation running up and down sandy beaches with his family. He’s explored hidden coves, learned how to write invisible letters, and even met an ocean nymph. But his friends write to tell him of strange happenings in Countryside and he’s anxious to get back.

When Luke returns, he finds that much has changed. Mischievous gnomes are spreading chaos across the valley, a lone wolf haunts the forests, and Mayeem, one of Luke’s new teachers, just happens to be a mermaid. And then there’s the hunter, a man with golden eyes, only part of a soul and the belief that Luke has hidden something he wants—something he’s willing to destroy Countryside in order to get.

Hounded by blackhearted men and soulless creatures and with darkness luring him in, Luke must gather his wits and ferret out his true friends. But as he draws close to finding what it is the hunter seeks, he will learn that there is more at stake than he understands. He’ll learn that it’s not the hunter he should be afraid of and that, once done, some things cannot be undone.”

My thoughts after reading this book…

Personally, I really enjoyed this book. Probably even better than the first time.  After “getting to know the characters” out of the way, the story was able to pick up not too long after the first book and it kept going strong. I love how the main character is taught respect for adults, and uses “sir” and “ma’am” even if he disagrees with someone.  

There are lots of elements of magic even though there were similarities to some Harry Potter. The magic was written well enough to stand on its own.  In this book, the students learn about the water discipline as well as trying to keep the Tears of Adina from falling into dark hands.  The settings were very easy to imagine with lots of great descriptions without being overly wordy and the magic was very enjoyable.  The book is beautifully written.

The book is targeted at fantasy readers, upper elementary and junior high, who enjoy series like Harry Potter,  Narnia, and Percy Jackson.     

 As a middle school teacher, I often read books designed for 4th-7th graders so I can recommend books to my students. This is a book that I will definitely recommend. However, any age fan of fantasy and magic would enjoy this story.  

Amazon currently has this book for purchase as a Kindle ebook for $3.99, hardback and paperback also available.  

For the Nook  Barnes and Noble currently has the ebook also for $3.99 with paperback and hardback available as well..

With both Amazon and Barnes and Noble, you do not have to have an E-Reader to purchase the book.  You may also download their free app to any phone or tablet and read the book from there.  Use the links above to set up your account and purchase the books while enjoying them on the go with your phone, tablet or E-Reader.  

Please use the menu bar above to find out about other great books, or click the links below.  


Posted in Birthday Parties, Minecraft Party

Minecraft Birthday Party

For my son’s 9th birthday, he decided he wanted a Minecraft theme. This was a lot of fun to make and he was so excited!

For the cake, we used Rice Krispy Treats which the kids thought was super cool. Due to his food allergies, we made ours from scratch but you could also buy a Rice Krispy Sheet or tray that is already made for easier prep. The best thing about making them from scratch or using a tray is that you can cut the squares any size that you would like. We used a 9 x 13 in pan, blue jello for the water, plain Rice Krispy treats for the sand, and Cocoa Rice Krispy treats with green icing for the dirt and grass. Add a few Minecraft Mini Figures like Steve and some Cows or Zombies and done!

My friend actually made this giant wall decoration made from light green, green and black square party plates. We used left over plates for the kids to gather their supplies (aka food).

She used hot glue to glue all of the plates to foam board which she also glued together. The result is in the picture. It was a great addition to the party.

Now for the awesome food!

minecraft party 4.jpg

I wish I could tell you how my friend made the super cute signs, but I’m not totally sure. I believe she used Google Images to cut and paste them together. However, I can tell you how I made the food.

We used..

  • Carrots – baby carrots
  • Sticks – pretzel sticks
  • Cookies – small chocolate chip cookies
  • Trap Doors- Window Pretzels
  • Diamonds – Blue hard candy (we bought ours at Party City, but attaching the Amazon link here in case you need a lot of them)
  • Emeralds – same as Diamonds, except in green
  • Iron – Hershey Nuggets
  • Gold- Hershey Nuggets
  • Mushrooms – these were fun, white jumbo puffy marshmallows topped with red icing and white chocolate chips.
  • Watermelon – watermelon taffy

Add Sprite bottles with labels peeled and turned into Creepers with a sharpie, and green party cups and a party was made!

If you would like to see some other themed birthday parties, click menu and birthday parties or click any of the links below.